
Introduction
I moved my blog to Pelican - a static site generator, in the middle of 2017. Pelican has Python in its core and doesn’t require a database or server-side logic to work. Pelican grabs content, merges it with the defined templates and outputs the result as HTML, CSS, JS, along with other static files (e.g. graphics or plain text files). All these files can then be uploaded to a server and literally, that’s it! The only thing that you should have on your server is a web server, like Apache or Nginx.
You can write content in your favorite text editor or IDE using reStructuredText, Markdown or AsciiDoc - simple, easy to read and understand formats. The best thing I like here is a process - you write something, save it, check the generated article, update the text again, save, check. It makes writing a pleasure, as you can see your changes immediately, so you want to repeat the process again and again. Lovely magic.
You may ask: “Why Pelican?” Well, the answer is pretty obvious. Nowadays the majority of websites (even the simplest ones) represent complex solutions based on PHP, MySQL, HTML, CSS, JavaScript and all these parts must work together to ensure seamless workflow and security. The thing here is that browsers still display HTML, CSS, and JavaScript that were downloaded from the server and it really doesn’t matter how these files were created/generated. Due to a multitude of components, all the modern CMSs are vulnerable to different cyber attacks aimed at compromising access credentials and disclosing private information. Pelican has nothing to hack, as there is no database and no files contain sensitive data. The server has only a web server serving static content, so there is no extra configuration or additional components. As the result, Pelican setup, as well as the generated website, is very lightweight. An incredible example of the KISS principle.
OK, let’s get to the point. By the end of this article, you will receive a fully functional Pelican website on top of GiLab Pages and will be able to apply changes by pushing a new commit.
Getting Started
NOTE: For this guide I use Ubuntu 17.04, but those of you who work on Windows shouldn’t have any troubles as well, everything is quite similar. If you think you need some help, feel free to contact me or leave a comment below this article.
Prerequisites
Before proceeding with Pelican and GitLab, you need to install the following basic packages:
- python. Pelican uses Python, so it should be installed first. As the Pelican documentation states, it runs best on Python 2.7.x and 3.3+, so you can choose the one that best suits your environment setup.
- pip. Python package manager. It will be used to install virtualenv, Pelican, and related packages.
- git. Version control system. It will be used to work with GitLab.
Use the command below to install these packages in bulk:
sudo apt install python3.6 python-pip git -yIn my case, all the required Python packages were available out-of-the-box, so I just installed git.
GitLab: Setup a Project
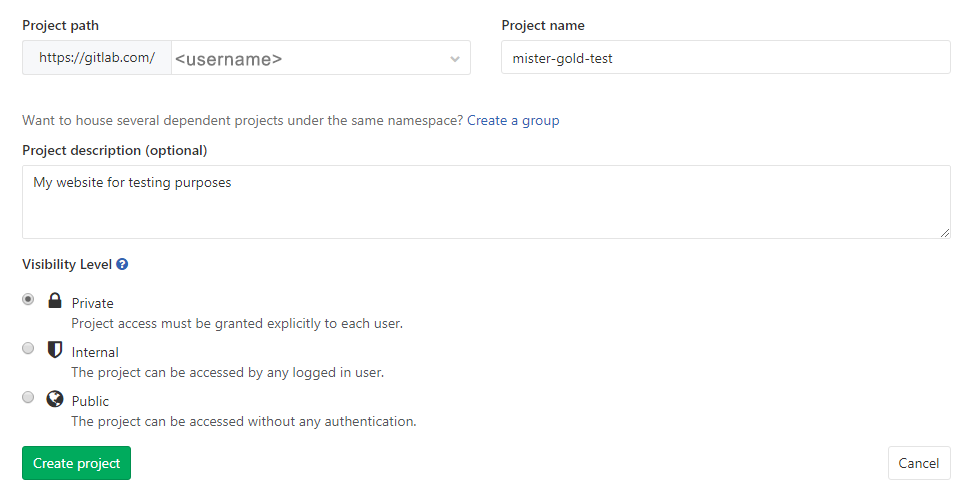
Create a new repository on GitLab. There are several considerations to keep in mind:
- If you create a project under your username (
<username>.gitlab.io), your website will be available underhttps://<username>.gitlab.io - If you create a project under a group name (
<groupname>.gitlab.io), your website will be available underhttps://<groupname>.gitlab.io
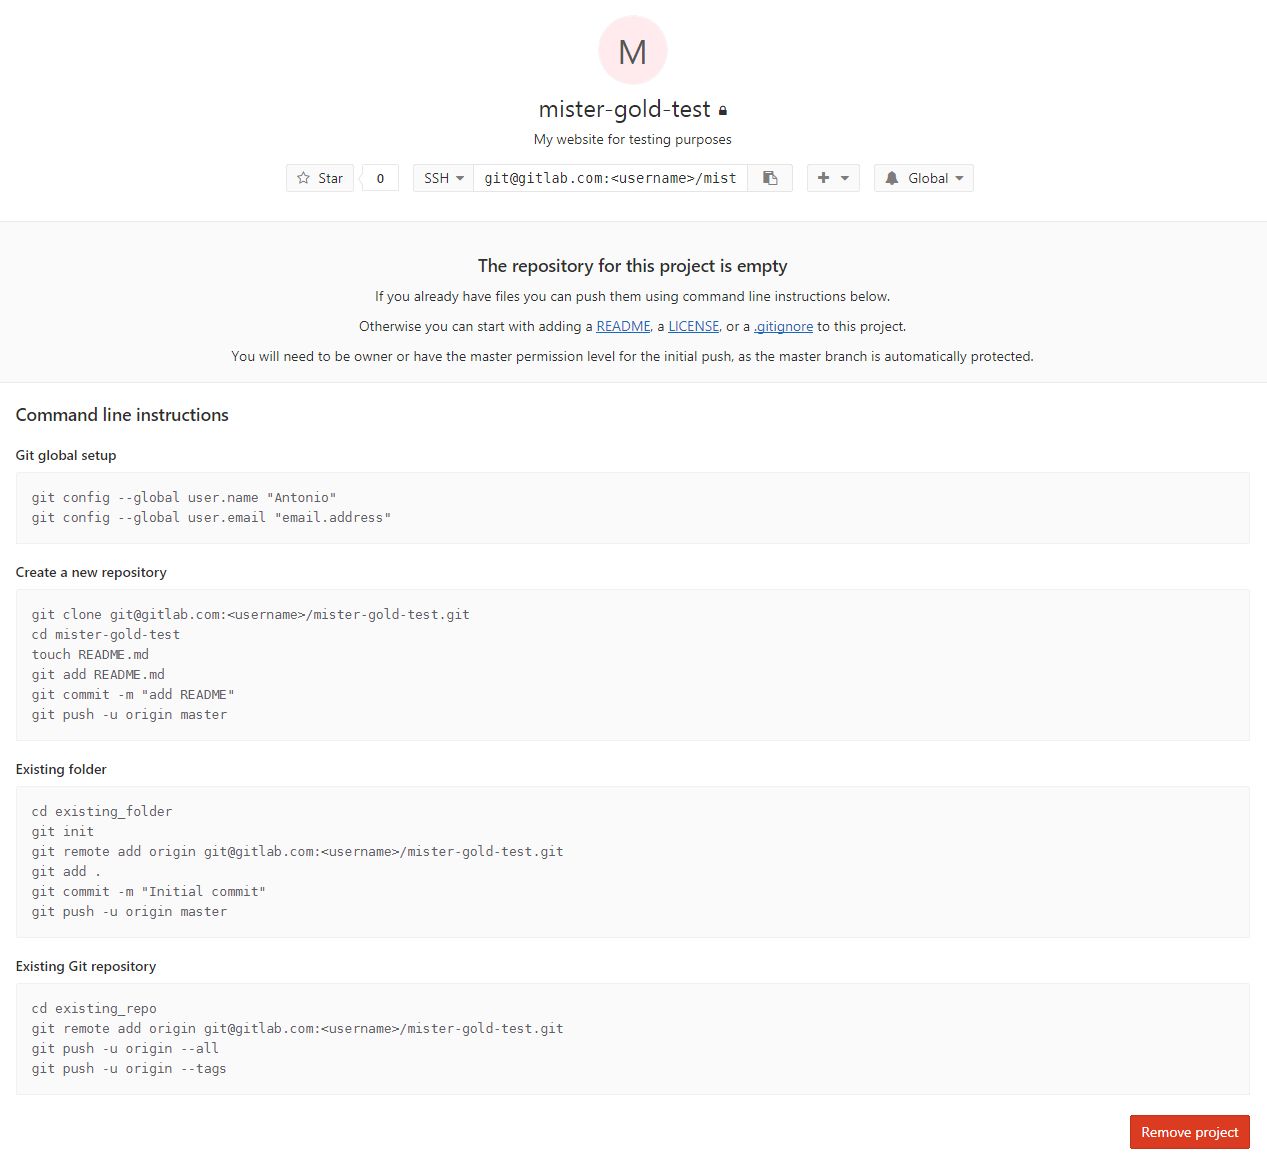
Choose a name wisely, as the associated address will be used in several places later. I created a repository under my username called mister-gold-test.
Virtualenv: Installation
virtualenv is a tool to create isolated Python environments. It is recommended to install Pelican in an isolated environment to avoid possible permission problems and version conflicts when multiple python projects (or packages) require different versions of the same libraries to work.
Install virtualenv:
pip install virtualenvCollecting virtualenv
Downloading virtualenv-15.1.0-py2.py3-none-any.whl (1.8MB)
100% |████████████████████████████████| 1.8MB 280kB/s
Installing collected packages: virtualenv
Successfully installed virtualenv-15.1.0Specify a path where you want to create a new environment for your website:
virtualenv ~/envRunning virtualenv with interpreter /usr/bin/python2
New python executable in /home/gold/env/bin/python2
Also creating executable in /home/gold/env/bin/python
Installing setuptools, pkg_resources, pip, wheel...done.Navigate to the folder and run the environment:
cd env/
source bin/activate
Your terminal should indicate that env environment became active:
(env) gold@gold-vb:~/env$Clone the GitLab Project
Once the environment created and activated, clone the previously created GitLab project in it:
git clone git@gitlab.com:<username>/mister-gold-test.git
Cloning into 'mister-gold-test'...
warning: You appear to have cloned an empty repository.

cd mister-gold-test
Install Pelican
After you have cloned the project repository into the virtual environment, proceed with the installation of Pelican.
pip install pelicanCollecting pelican
Downloading pelican-3.7.1-py2.py3-none-any.whl (134kB)
100% |████████████████████████████████| 143kB 1.2MB/s
Collecting six>=1.4 (from pelican)
Downloading six-1.11.0-py2.py3-none-any.whl
Collecting unidecode (from pelican)
Downloading Unidecode-0.04.21-py2.py3-none-any.whl (228kB)
100% |████████████████████████████████| 235kB 1.5MB/s
Collecting pytz>=0a (from pelican)
Downloading pytz-2017.2-py2.py3-none-any.whl (484kB)
100% |████████████████████████████████| 491kB 1.0MB/s
Collecting docutils (from pelican)
Downloading docutils-0.14-py2-none-any.whl (543kB)
100% |████████████████████████████████| 552kB 827kB/s
Collecting blinker (from pelican)
Downloading blinker-1.4.tar.gz (111kB)
100% |████████████████████████████████| 112kB 3.3MB/s
Collecting pygments (from pelican)
Downloading Pygments-2.2.0-py2.py3-none-any.whl (841kB)
100% |████████████████████████████████| 849kB 696kB/s
Collecting python-dateutil (from pelican)
Downloading python_dateutil-2.6.1-py2.py3-none-any.whl (194kB)
100% |████████████████████████████████| 194kB 2.2MB/s
Collecting feedgenerator>=1.9 (from pelican)
Downloading feedgenerator-1.9.tar.gz (4.1MB)
100% |████████████████████████████████| 4.1MB 183kB/s
Collecting jinja2>=2.7 (from pelican)
Downloading Jinja2-2.9.6-py2.py3-none-any.whl (340kB)
100% |████████████████████████████████| 348kB 2.2MB/s
Collecting MarkupSafe>=0.23 (from jinja2>=2.7->pelican)
Downloading MarkupSafe-1.0.tar.gz
Building wheels for collected packages: blinker, feedgenerator, MarkupSafe
Running setup.py bdist_wheel for blinker ... done
Stored in directory: /home/gold/.cache/pip/wheels/7b/8a/eb/5a4f4444f366c515073db8a129c92d4727ad945e5e64b9e8bd
Running setup.py bdist_wheel for feedgenerator ... done
Stored in directory: /home/gold/.cache/pip/wheels/6a/7e/41/7ed20833c4cae3d36c5e373ac5d8d9eee58546b87c1b9505fe
Running setup.py bdist_wheel for MarkupSafe ... done
Stored in directory: /home/gold/.cache/pip/wheels/88/a7/30/e39a54a87bcbe25308fa3ca64e8ddc75d9b3e5afa21ee32d57
Successfully built blinker feedgenerator MarkupSafe
Installing collected packages: six, unidecode, pytz, docutils, blinker, pygments, python-dateutil, feedgenerator, MarkupSafe, jinja2, pelican
Successfully installed MarkupSafe-1.0 blinker-1.4 docutils-0.14 feedgenerator-1.9 jinja2-2.9.6 pelican-3.7.1 pygments-2.2.0 python-dateutil-2.6.1 pytz-2017.2 six-1.11.0 unidecode-0.4.21In order to be able to write articles in Markdown, it is also necessary to install the appropriate package:
pip install markdownCollecting markdown
Downloading Markdown-2.6.9.tar.gz (271kB)
100% |████████████████████████████████| 276kB 920kB/s
Building wheels for collected packages: markdown
Running setup.py bdist_wheel for markdown ... done
Stored in directory: /home/gold/.cache/pip/wheels/bf/46/10/c93e17ae86ae3b3a919c7b39dad3b5ccf09aeb066419e5c1e5
Successfully built markdown
Installing collected packages: markdown
Successfully installed markdown-2.6.9Generate a Basic Website
Okay, Pelican has been installed and you can test it. Launch the pelican-quickstart command to create a basic skeleton website:
pelican-quickstartThis script asks you some questions about a website to be created and generates all the required files:
Welcome to pelican-quickstart v3.7.1.

This script will help you create a new Pelican-based website.

Please answer the following questions so this script can generate the files
needed by Pelican.

> Where do you want to create your new web site? [.]
> What will be the title of this web site? Mister Gold Test
> Who will be the author of this web site? Antonio
> What will be the default language of this web site? [en]
> Do you want to specify a URL prefix? e.g., http://example.com   (Y/n)
> What is your URL prefix? (see above example; no trailing slash) https://<username>.gitlab.io/mister-gold-test
> Do you want to enable article pagination? (Y/n)
> How many articles per page do you want? [10]
> What is your time zone? [Europe/Paris]
> Do you want to generate a Fabfile/Makefile to automate generation and publishing? (Y/n)
> Do you want an auto-reload & simpleHTTP script to assist with theme and site development? (Y/n)
> Do you want to upload your website using FTP? (y/N)
> Do you want to upload your website using SSH? (y/N)
> Do you want to upload your website using Dropbox? (y/N)
> Do you want to upload your website using S3? (y/N)
> Do you want to upload your website using Rackspace Cloud Files? (y/N)
> Do you want to upload your website using GitHub Pages? (y/N)
Done. Your new project is available at /home/gold/env/mister-gold-test
Pay attention to a URL prefix - this is an address to your website you got after creating your project in GitLab (That I recommended you to choose wisely). The rest of questions you can leave in their defaults. Default values are capitalized (Y/n or y/N).
Add an article
pelican-quickstart generates the base Pelican structure that allows you to extend it and customize according to your needs, but all articles should be added manually.
Open the folder ~/env/mister-gold-test/content in your file explorer and create a file called article.md with the following contents:
Title: My first article
Date: 2017-10-14 00:01
Modified: 2017-10-15 00:10
Category: python
Tags: pelican, gitlab
Slug: my-first-article
Authors: Antonio
Summary: Short version for index and feeds

This is the content of my first article
The markdown package was installed previously to support Markdown syntax and all the metadata that are set before the article body.
Generate HTML output
Before converting your article into HTML and see how the website looks like, apply the following trick to simplify further integration with GitLab.
Change the output folder
By default Pelican puts the generated files into output folder and this won’t work in GitLab because it requires static files to be located in public folder.
To change the output folder, navigate to the project folder (~/env/mister-gold-test), find pelicanconf.py and publishconf.py files and then add the following line to these files:
OUTPUT_PATH = 'public/'To do the same for local development, open the Makefile file and change this
OUTPUTDIR=$(BASEDIR)/outputto this
OUTPUTDIR=$(BASEDIR)/publicThese two manipulations will force Pelican to put all the generated files to the public folder. Now you can delete output folder, you are no longer need it.
Once finished, you can convert your first article into HTML using either pelican command, specifying the path to your content, or make command:
pelican content
Done: Processed 1 article, 0 drafts, 0 pages and 0 hidden pages in 0.21 seconds.
make html
pelican /home/gold/env/mister-gold-test/content -o /home/gold/env/mister-gold-test/public -s /home/gold/env/mister-gold-test/pelicanconf.py
Done: Processed 1 article, 0 drafts, 0 pages and 0 hidden pages in 0.23 seconds.All the generated static files will be located in public folder now.
View the generated files
To preview the generated files, use make serve command:
make serve
cd /home/gold/env/mister-gold-test/public && python -m pelican.server
You can also navigate to the public folder and run a simple web server using Python. The command syntax depends on the version of Python you use:
For Python 2.7.x:
cd public
python -m SimpleHTTPServer
For Python 3.x:
cd public
python -m http.server
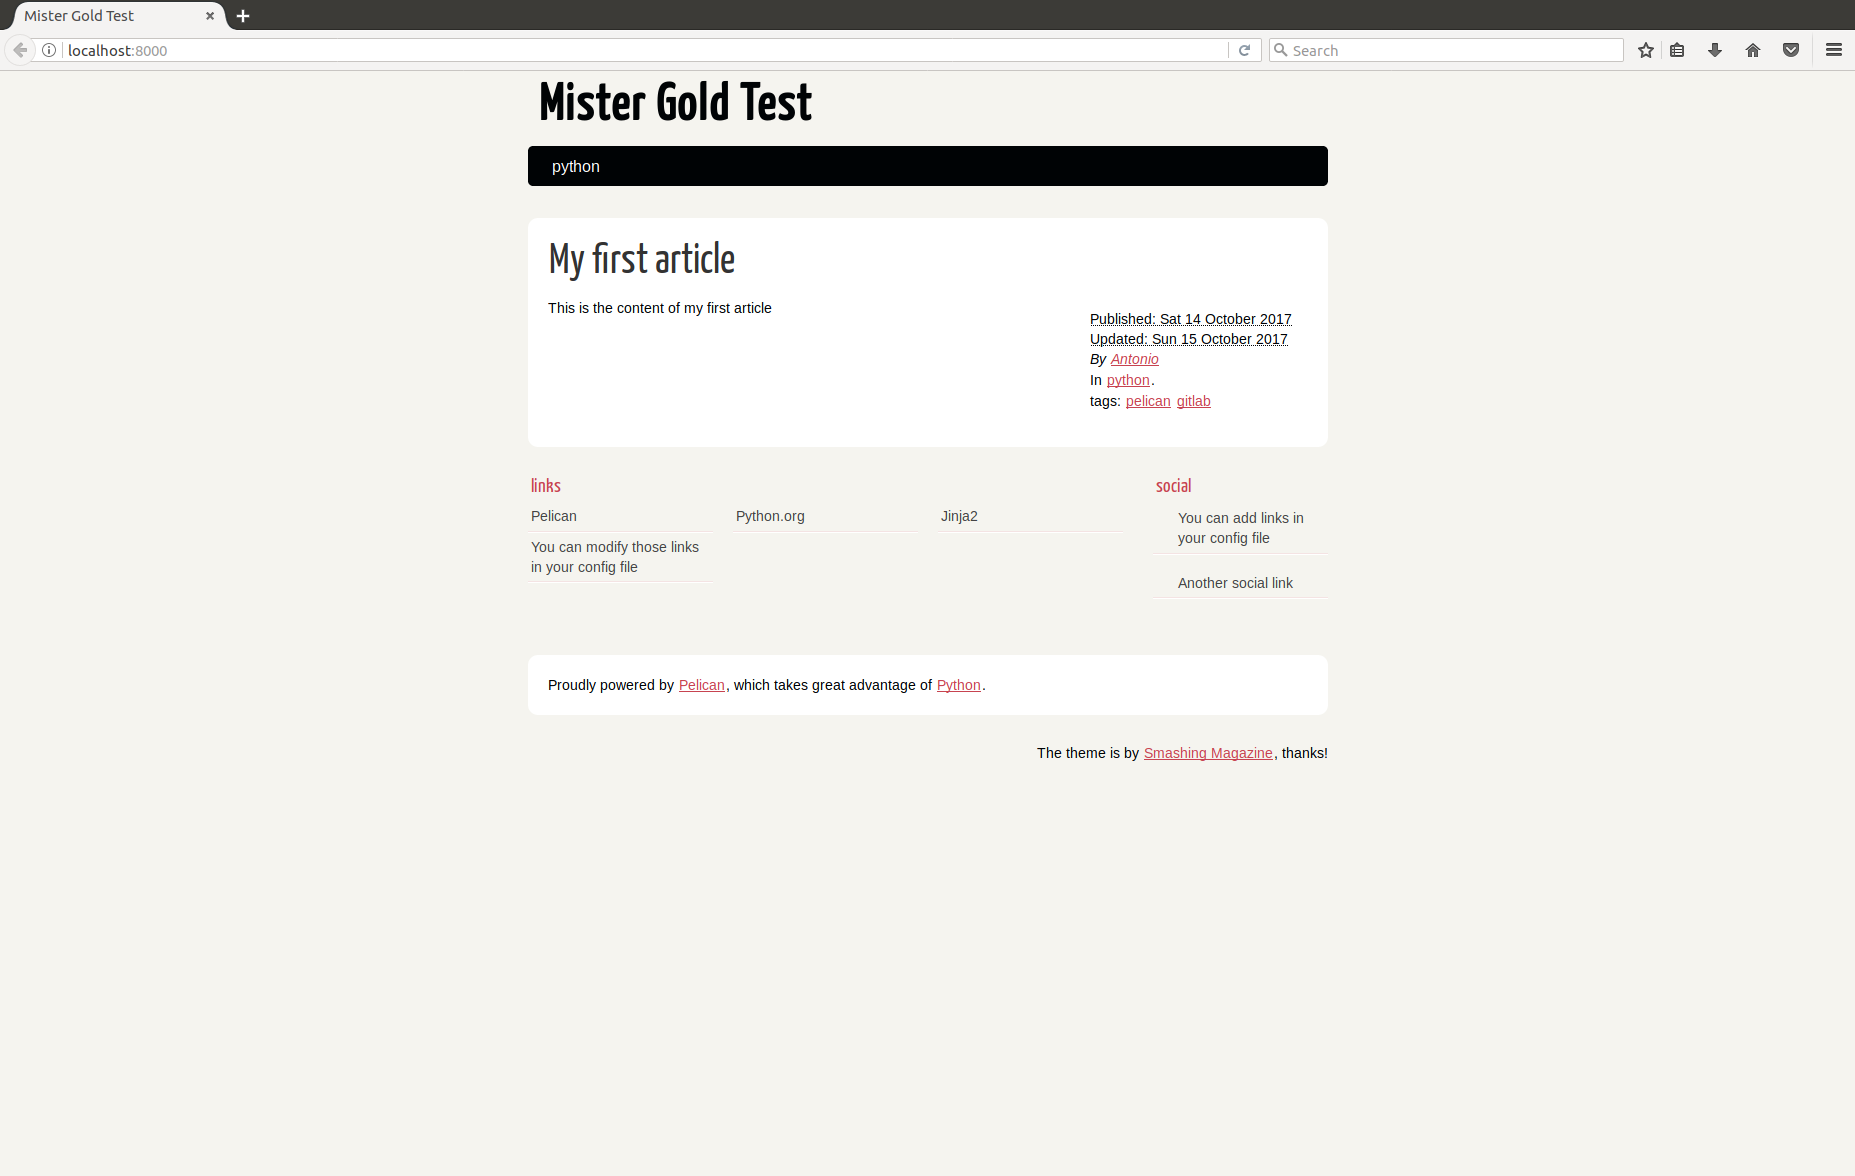
Once launched, open http://localhost:8000 in your web browser:
Configuration for GitLab
To properly configure GitLab to work with Pelican, you need to create 3 files: requirements.txt, .gitlab-ci.yml, .gitignore, and enable Shared Runners.
requirements.txt
Open your project folder (~/env/mister-gold-test) and create a requirements.txt file with the following contents:
pelican
markdown
This file contains a list of packages that should be installed when creating your website. These are the same commands that were executed inside the virtual environment.
.gitlab-ci.yml
.gitlab-ci.yml is a configuration file that will build and deploy your website to GitLab. Create a .gitlab-ci.yml file (with the leading dot) and add the following contents to it:
image: python:3.6-alpine

pages:
  script:
  - pip install -r requirements.txt
  - pelican -s publishconf.py
  artifacts:
    paths:
    - public/
This file contains definitions of how a project should be built:
- image - defines a Docker image that will be used during build time.
- pages - a special job that is used to upload static content to GitLab. It has two main requirements:
- any static content must be placed under a
publicdirectory (that’s why you had to change default output folder in Pelican) - artifacts with a path to the
publicdirectory must be defined (you can see these lines in.gitlab-ci.yml) - script - a shell script that is executed by the Runner
- artifacts - a job that specifies a list of files and directories which should be attached to the
pagesjob after successful completion.
- any static content must be placed under a
In other words, once a new change is committed, it triggers CI Pipeline. GitLab checks gitlab-ci.yml and launches Runner to perform all the steps defined in the file. A runner is basically a virtual machine that picks up a job via GitLab CI API. In our case, Runner will use docker image with python 3.6 version, install pelican, markdown and then convert the existing content to HTML using data from publishconf.py configuration file. The resulting files (artifacts) will be placed in public folder that is publicly available.
.gitignore
Since all the content will be processed on GitLab side, there is no need to save the public folder in git. Also, Pelican creates some compiled files when building the website - these files should also be ignored. Open the project folder and create a .gitignore file with the following lines:
/public
*.pyc
Shared Runners
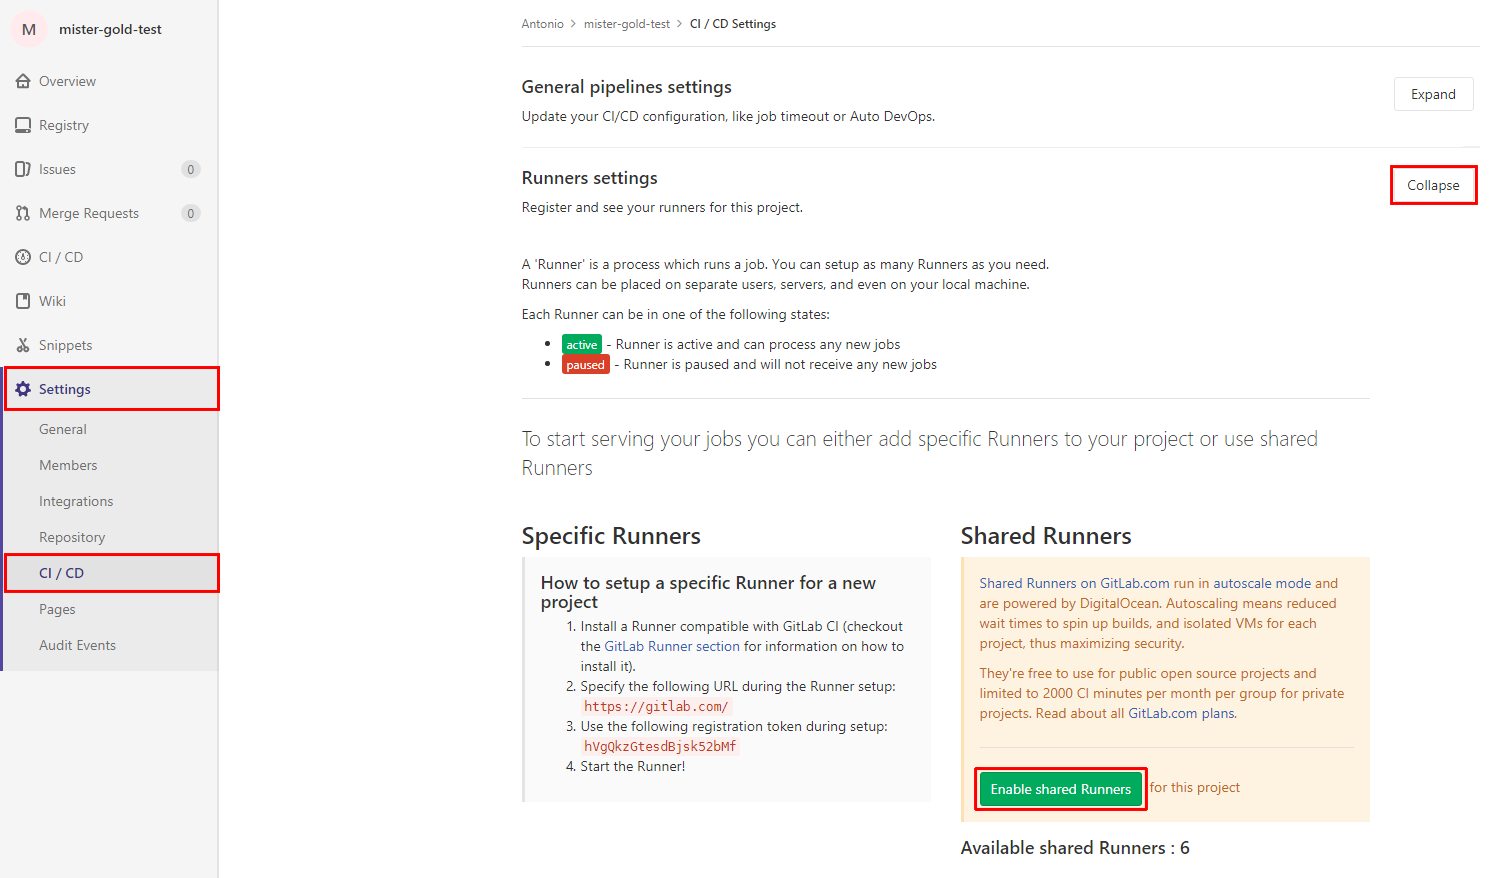
To allow your project to trigger CI process, you need to enable Shared Runners. Open your GitLab Project, Settings > CI/CD > Pipelines. Expand the Runners settings section and make sure that Shared Runners are enabled.
Publish on GitLab
The final step is publishing your website. To do this, simply commit and push the project folder to the repository.
git add .
git status

On branch master

Initial commit

Changes to be committed:
  (use "git rm --cached <file>..." to unstage)

	new file:   .gitignore
	new file:   .gitlab-ci.yml
	new file:   Makefile
	new file:   content/article.md
	new file:   develop_server.sh
	new file:   fabfile.py
	new file:   pelicanconf.py
	new file:   publishconf.py
	new file:   requirements.txt
But first, I advise you to check carefully the files that were modified in the working directory. Also notice that if you did everything right with gitignore, you shouldn’t see the public folder and any compiled python files here - they are ignored by git.
Everything is good, let’s commit it:
git commit -m "Initial project state"

[master (root-commit) c81bdd9] Initial project state
 9 files changed, 403 insertions(+)
 create mode 100644 .gitignore
 create mode 100644 .gitlab-ci.yml
 create mode 100644 Makefile
 create mode 100644 content/article.md
 create mode 100755 develop_server.sh
 create mode 100644 fabfile.py
 create mode 100644 pelicanconf.py
 create mode 100644 publishconf.py
 create mode 100644 requirements.txt
and push:
git push origin master

Counting objects: 12, done.
Delta compression using up to 2 threads.
Compressing objects: 100% (9/9), done.
Writing objects: 100% (12/12), 4.98 KiB | 0 bytes/s, done.
Total 12 (delta 0), reused 0 (delta 0)
To gitlab.com:<username>/mister-gold-test.git
 * [new branch]      master -> master
After that you can check the status of the current build:


and the CI Pipeline Build log:
Running with gitlab-runner 10.1.0-rc.1 (946e835b)
  on docker-auto-scale (4e4528ca)
Using Docker executor with image python:3.6-alpine ...
Using docker image sha256:ae26e16b7a5e8895ff9ad2f72d3a505394d06b94012b6bd623a46d5268f43c92 for predefined container...
Pulling docker image python:3.6-alpine ...
Using docker image python:3.6-alpine ID=sha256:d26cf7d4701d0c82caabe7f58164a372c5cc1c3dde5ec9c29d1eaeb75075cc95 for build container...
Running on runner-4e4528ca-project-4393246-concurrent-0 via runner-4e4528ca-srm-1508088671-157c532f...
Cloning repository...
Cloning into '/builds/<username>/mister-gold-test'...
Checking out c81bdd9c as master...
Skipping Git submodules setup
$ pip install -r requirements.txt
Collecting pelican (from -r requirements.txt (line 1))
  Downloading pelican-3.7.1-py2.py3-none-any.whl (134kB)
Collecting markdown (from -r requirements.txt (line 2))
  Downloading Markdown-2.6.9.tar.gz (271kB)
Collecting jinja2>=2.7 (from pelican->-r requirements.txt (line 1))
  Downloading Jinja2-2.9.6-py2.py3-none-any.whl (340kB)
Collecting docutils (from pelican->-r requirements.txt (line 1))
  Downloading docutils-0.14-py3-none-any.whl (543kB)
Collecting pygments (from pelican->-r requirements.txt (line 1))
  Downloading Pygments-2.2.0-py2.py3-none-any.whl (841kB)
Collecting python-dateutil (from pelican->-r requirements.txt (line 1))
  Downloading python_dateutil-2.6.1-py2.py3-none-any.whl (194kB)
Collecting unidecode (from pelican->-r requirements.txt (line 1))
  Downloading Unidecode-0.04.21-py2.py3-none-any.whl (228kB)
Collecting blinker (from pelican->-r requirements.txt (line 1))
  Downloading blinker-1.4.tar.gz (111kB)
Collecting feedgenerator>=1.9 (from pelican->-r requirements.txt (line 1))
  Downloading feedgenerator-1.9.tar.gz (4.1MB)
Collecting six>=1.4 (from pelican->-r requirements.txt (line 1))
  Downloading six-1.11.0-py2.py3-none-any.whl
Collecting pytz>=0a (from pelican->-r requirements.txt (line 1))
  Downloading pytz-2017.2-py2.py3-none-any.whl (484kB)
Collecting MarkupSafe>=0.23 (from jinja2>=2.7->pelican->-r requirements.txt (line 1))
  Downloading MarkupSafe-1.0.tar.gz
Building wheels for collected packages: markdown, blinker, feedgenerator, MarkupSafe
  Running setup.py bdist_wheel for markdown: started
  Running setup.py bdist_wheel for markdown: finished with status 'done'
  Stored in directory: /root/.cache/pip/wheels/bf/46/10/c93e17ae86ae3b3a919c7b39dad3b5ccf09aeb066419e5c1e5
  Running setup.py bdist_wheel for blinker: started
  Running setup.py bdist_wheel for blinker: finished with status 'done'
  Stored in directory: /root/.cache/pip/wheels/7b/8a/eb/5a4f4444f366c515073db8a129c92d4727ad945e5e64b9e8bd
  Running setup.py bdist_wheel for feedgenerator: started
  Running setup.py bdist_wheel for feedgenerator: finished with status 'done'
  Stored in directory: /root/.cache/pip/wheels/6a/7e/41/7ed20833c4cae3d36c5e373ac5d8d9eee58546b87c1b9505fe
  Running setup.py bdist_wheel for MarkupSafe: started
  Running setup.py bdist_wheel for MarkupSafe: finished with status 'done'
  Stored in directory: /root/.cache/pip/wheels/88/a7/30/e39a54a87bcbe25308fa3ca64e8ddc75d9b3e5afa21ee32d57
Successfully built markdown blinker feedgenerator MarkupSafe
Installing collected packages: MarkupSafe, jinja2, docutils, pygments, six, python-dateutil, unidecode, blinker, pytz, feedgenerator, pelican, markdown
Successfully installed MarkupSafe-1.0 blinker-1.4 docutils-0.14 feedgenerator-1.9 jinja2-2.9.6 markdown-2.6.9 pelican-3.7.1 pygments-2.2.0 python-dateutil-2.6.1 pytz-2017.2 six-1.11.0 unidecode-0.4.21
$ pelican -s publishconf.py
WARNING: Feeds generated without SITEURL set properly may not be valid
Done: Processed 1 article, 0 drafts, 0 pages and 0 hidden pages in 0.28 seconds.
Uploading artifacts...
public: found 46 matching files
Uploading artifacts to coordinator... ok            id=36292241 responseStatus=201 Created token=tEvi_fb_
Job succeeded
You can see that GitLab CI logic is straightforward and it did the same operations that we performed after activating the virtual environment.
Once both jobs completed successfully, you can open https://<username>.gitlab.io/mister-gold-test and check your website. You can also see this URL by navigating to GitLab Settings > Pages:

So, the moment of truth - accessing the website via a browser:
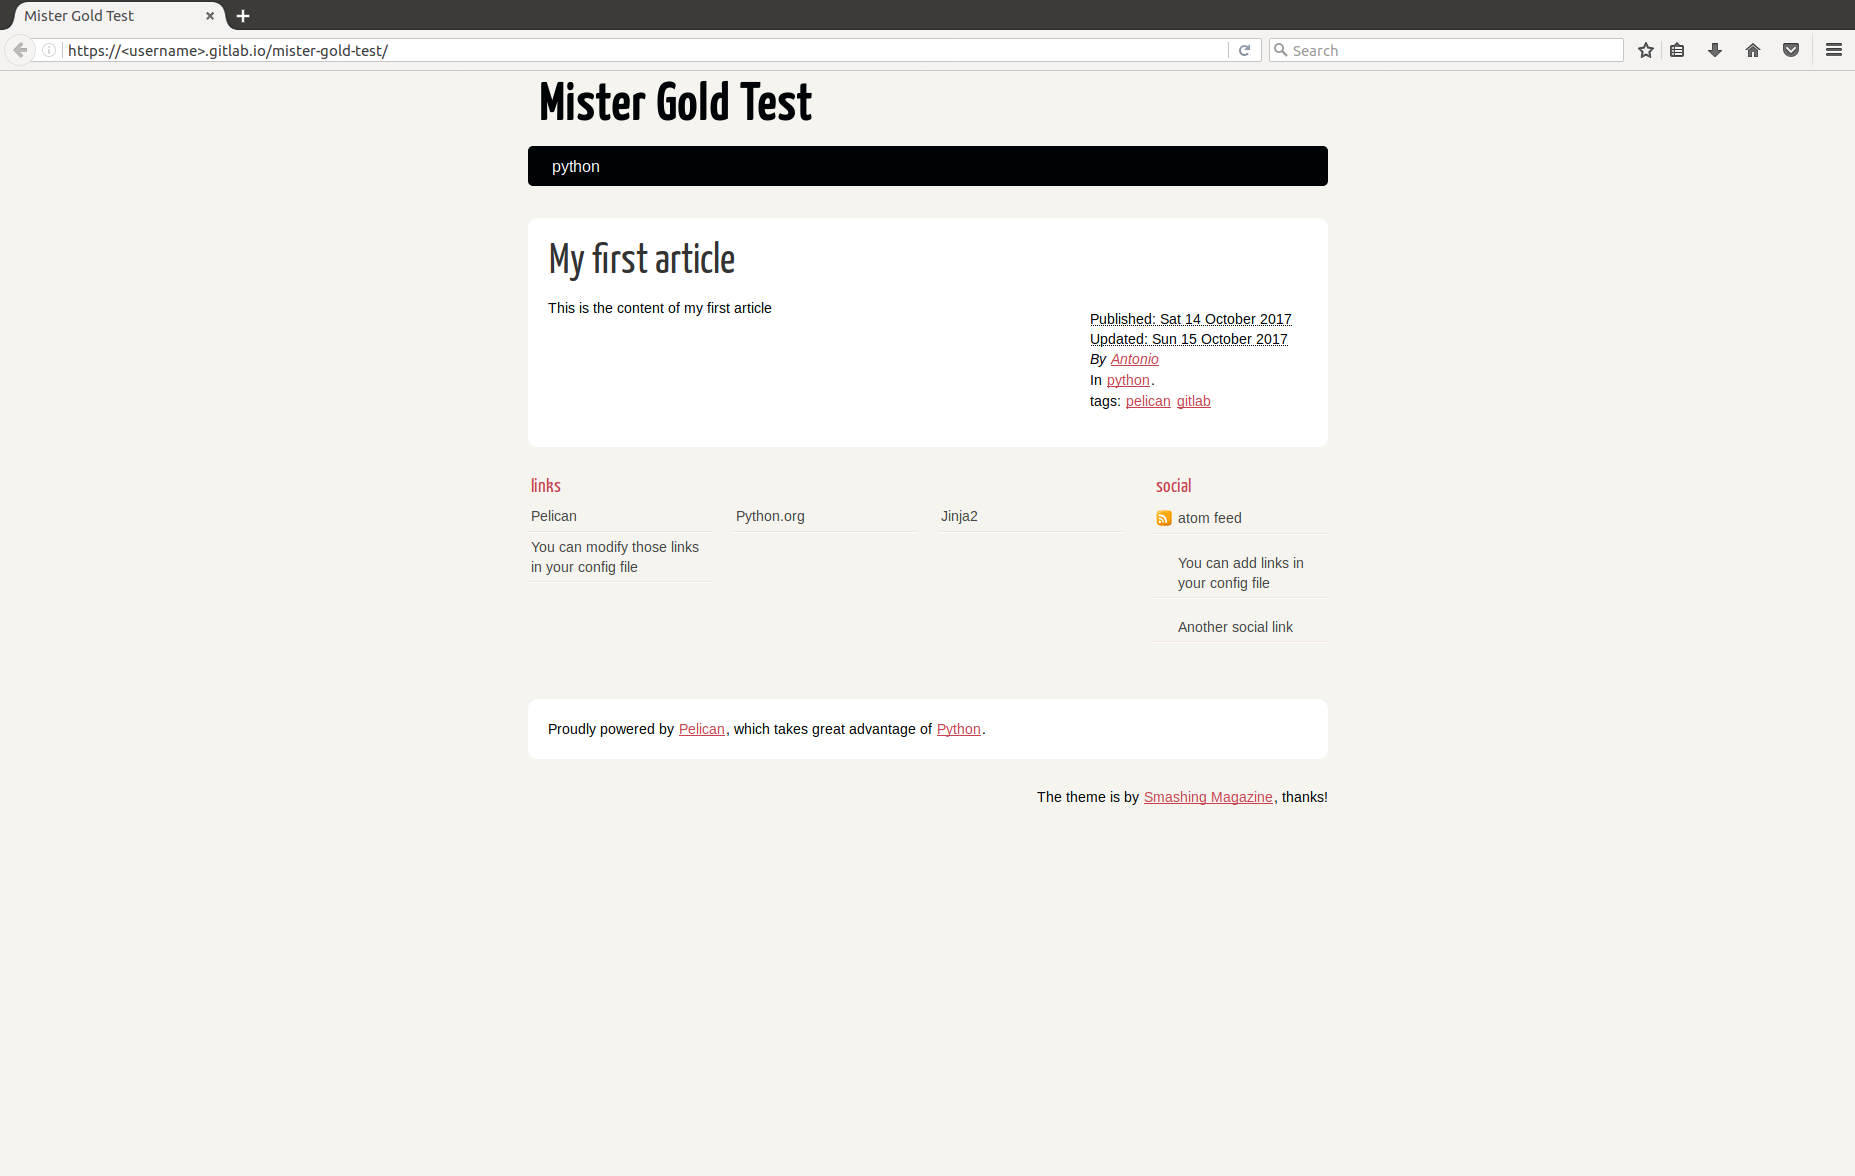
YEES! It works! You should now have a fully working Pelican website, being served by GitLab. This is, actually, the way how I created this blog, so it represents a live example of what you can achieve with Pelican and GitLab Pages. You may also consider the following steps:
In my case, all these steps are fulfilled :)
References
- Pelican Documentation
- GitLab Pages Documentation
- Hosting on GitLab.com with GitLab Pages
- Pelican on GitLab Pages
Hope you found this guide helpful!
That’s it! See you in new articles!